
Prototype App Creates Contextual Images For Audio Podcasts
Motivation For This Post
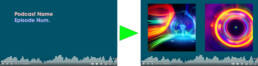
Watching a sound wave or unrelated images for a podcast that is published in a platform that supports video and images can be dull.
We propose asking a trio of AI models, bundled in an app we call Talkomic, to generate images that that are closely tied to the audio content discussed in the podcast.
The team at Rendergon Ltd responsible for the development of the Tapgaze apps has worked on this prototype. We are new to this field, keen to tinker and learn ! The prototype has been tested on the Unity Editor and Windows 11 build. It also provides a good start as a proof of concept to test the ability of AI models to help audio media augment its reach.
Audio-To-Text-To-Image
The app’s AI Models transcribe an audio file to text and generate contexual images closely tied to the transcribed text.
Get Talkomic App Code
Prototype Built in Unity
Code powered by cross-platform OnnxRuntime
Watch The Trailer
Special thanks to Jason Gauci co-host at Programming Throwdown podcast whose idea shared on this podcast served as inspiration for this prototype.
I am thrilled and truly grateful to Maurizio Raffone at Tech Shift F9 Podcast for trusting me to run a proof of concept of the Talkomic app prototype with the audio file of a fantastic episode in this podcast.
Watch The Talkomized TechShift-F9 Podcast Episode
Check It Out
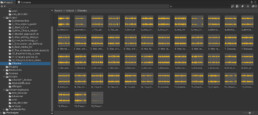
View and Download The Podcast AI Images
Browse Them
How The Talkomic App Works
Chain AI-Model WorkFlow
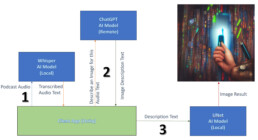
We chain the results of three AI models to generate the images for an audio podcast.
We initially got the project to run with Unity’s neural network Sentis, currently on closed beta, and added some Onnxruntime to make it work. The project in this blog is exclusively based on Onnxruntime. Unity’s team is making great strides with Sentis and I look forward to future updates !
In our Unity project, we run two of the AI models locally and access a third AI model remotely via an API.
We bundle these models inside Unity3D.
In a Unity scene we loop the AI Models over each podcast audio section to generate the contextual images.
The AI Models
We use Onnx AI models format.
1. Whisper AI Model
This model transcribes audio into text. Whisper is a Transformer based encoder-decoder model, also referred to as a sequence-to-sequence model. It was trained on 680k hours of labelled speech data annotated using large-scale weak supervision. This is the smallest of the 5 Whisper models available with 39M parameters, a great candidate to run on a mobile device.
We convert the transformer whisper-tiny AI model into Onnx format using Microsoft Olive. The Olive github repo has a useful example with the configuration required to optimize this model using ONNXRuntime tools:
Whisper requires pre-and-post processing steps for audio inputs / model outputs. It would have been challenging to do this using python libraries in Unity. Fortunately Onnx optimization runs WhisperProcessor inside the AI Model, removing the need to code these outside! You can learn more about this feature and more in Microsoft’s Build Onnxruntime demo.
Whisper configuration with Olive
I can suggest these steps for a quick whisper configuration with Olive:
- create and activate python 3.10 environment
- git clone Olive
- cd Olive
- python -m pip install .
- cd ./examples/whisper
- python -m pip install -r requirements.txt
Whisper workflow configuration (watch out with copy/paste formatting char errors):
- cd examples/whisper
- prepare the workflow config json: python prepare_whisper_configs.py –model_name openai/whisper-tiny.en
- Run config to optimize the model: python -m olive.workflows.run –config whisper_cpu_int8.json –setup
- Optimize the model: python -m olive.workflows.run –config whisper_cpu_int8.json
- Test a transcription: python test_transcription.py –config whisper_cpu_int8.json
- N.B. – To re-make the model you’d need to clean the cache and existing generated directories within the whisper directory
- To export the onnx model, the best candidate for the hardware config requested is in the zip models/ whisper_cpu_int8.zip directory CandidateModels\device-device\BestCandidateModel_1\model.onnx. Config settings at configurations.json and inference_config.json in this same directory.
Chunked Audio
The Whisper model is designed to work on audio samples of up to 30s in duration. Hence we chunk the podcast for each section in chunks of max 30 seconds but load these as a loop in Whisper-tiny for each podcast section.
2. ChatGPT Model
As a large language model, and unlike Unet, Chatgpt can help us generate text that describes an image that is closely tied to the discussion in the podcast.
- Requests: Using Azure OpenAI’s REST API, we request with UnityWebRequest this description from ChatGPT 3.5-turbo AI model.
- Our prompt to ChatGPT which attempts to limit faces drawn for podcast participants: “Provide a concise answer of no more than {maxChatgptRequestedResponseWords} words: Describe an abstract image for this conversation. Do not use names of people or persons. Do not say in the description it is an image of a person. The center or protagonist of the image you describe is not a person. Do not explain the image you describe, only describe the image. This is the conversation:” <section_transcribed_audio_chunks>
3. Stable Diffusion AI Model
These models are trained on 256-A 100 GPUs, ~150k hours, ~120M image-text pairs.
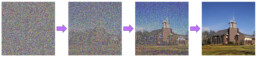
Generally speaking, these are models trained to denoise random Gaussian noise step by step to get to an image: the neural network is trained to predict the noise at step t on a corrupted image, and reverse the probability density function to t0 or denoised image. A drawback is that they can be slow.
I can suggest this visually intuitive blog and this blog to learn more.
Implementation: We thank @sd-akashic @Haoming02 @Microsoft for helping to better understand onnxruntime implementation in Unity:
- We clone the stable diffusion v1.4 model from branch onnx in Huggingface
- This is a type of diffusion model called Latent Diffusion: The model is trained to generate latent (compressed) representations of the images, which is faster than using the actual (larger) pixel space
- Get the onnx models and unet weights .pb file:
- the clone v1.4 above
- git clone v1.4 onnx branch
- or also here
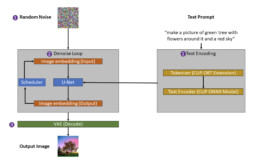
- These are the main components in Latent Diffusion pipeline:
- Text Tokenizer (get cliptokenizer.onnx here): Your text prompt (of what to draw) is tokenized (into a list of tokens). The tokenizer used must match the one used by the Text Encoder model, in this case the CLIP model.
- Text Encoder: An AI model trained independently of the stable diffusion model used. It learns to associate text with images.
- We use it to encode text to embeddings at UNet inference: In this step we transform your tokenized text prompt into into a vector that is used to guide the image generation
- This stable diffusion model uses the CLIP model (Contrastive Language–Image Pre-training)
- OpenAI claims CLIP efficiently learns visual concepts from natural language supervision.
- Scheduler: The scheduling algorithm used to progressively add noise to the image during training. It helps compute the predicted denoised image representation from the previous noise representation and the predicted noise residual.
- U-Net Model: Stable diffusion is implemented on a U-Net architecture. The main concepts involved at Inference:
- A latent noisy image is created as a starting point. The U-Net model steps through; at each step the output, being the noise residual, is used to compute a denoised latent image representation via a scheduler algorithm. At step 0 we get the clear denoised image.
- We create with the Text Encoder a set of (conditioned) embeddings for our text prompt (tokenized with the Text Tokenizer) and another unconditioned, meaning empty (random). We apply a guidance scale to lean closer towards what our conditioned embedding suggests rather than pure random unconditioned embedding.
- Autoencoder (VAE): Separately trained to the U-Net model. At training it converts an image into a low dimensional latent (compressed) representation (AI model input). At inference it converts denoised latents (AI model output) generated by the reverse diffusion process into images.
The images for this podcast were generated with the following text prompt input to the stable diffusion model: “Create an image cyberpunk style. <ChatGPT Image Description>”
4. Real-ESRGAN AI Model
We enhance the details of the 512×512 images generated by the stable diffusion AI model to crisper 2048×2048 resolutions.
We thank ai-forever for posting the models and git repo.
My suggested steps for quick git installation (steps up to date in my forked repo):
- Clone the repo
- Get the models and move to project Real-ESRGAN/weights
- As it’s customary, a python environment is helpful and worked for me on a conda python 3.10 env
- cd into project Real-ESRGAN/
- python -m pip install -r requirements.txt
- python setup.py develop
- Set the target resolution in main.py, i.e. load_weights RealESRGAN_x8.pth and model scale (model = RealESRGAN(device, scale=4)) where scale=2/4/8
- Execute: python main.py
- Fast on linux running on cuda, slow on VBox running on cpu
ESRGAN Enhanced Example. All enhanced images available to download here.
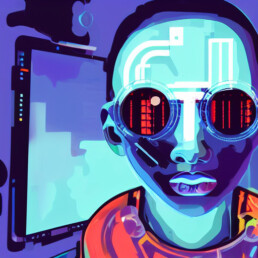
512×512 Stable Diffusion v. 1.4 model

2048×2048 ESRGAN enhanced